Setting up SSL with pihole, without a FQDN
Introduction
This post aims to present an alternative way to generate SSL certificates for your pihole web interface. This is specifically targeted at people without a FQDN (Fully Qualified Domain Name), regardless of whether pihole is hosted locally or on a VPS. Note that this has only tested on a locally hosted pihole instance, running on a Raspberry Pi 3B+. As usual, apply common sense before running commands from strangers on the internet - just because it worked on my system, doesn't necessarily mean it'll work in general. While we're at it, if this is properly configured, it shouldn't cause any problems. Even an invalid SSL certificate would just affect your connection, and not something like SSH or pihole in general.
There's many reasons to set up HTTPS. Setting it up on a local network has arguably fewer. Personally, my main reason for setting up HTTPS on a local network is that I don't feel comfortable sending a password to something rather personal over an unencrypted connection when I can't be check if there's a reason to worry.
Obviously, everyone has their own reasons, and while we can argue all day about the legitimacy of various worries, why bother? Worst case scenario, the encryption is unnecessary. Peace of mind is priceless.
There's already an official guide on this, but it uses LetsEncrypt, which doesn't support local domains. The code in this guide, specifically related to /etc/lighttpd/external.conf, is still used and has been slightly adapted. If you have a FQDN, use the official guide, and not this. This here assumes you're running a system that prevents you from having a FQDN, and want an alternative.
Note: this approach uses self-signed certificates, which most browsers don't trust. There's also a script, which I'll attach at the end of the post, for regenerating the CA and certificate, without breaking it. (Tested locally; different sha1 sums on the CA, but no need to reload it)
Additionally, this requires some familiarity with the command line, and assumes you already have pihole up and running, and in an accessible state. The only package you need for this is openssl, which you most likely already have.
Disclaimer
This is not meant as a perfect, 100% guaranteed to work guide. This post exists to share what I found while trying to deal with this heavily underdocumented aspect of getting HTTPS to work. This may not work in your specific case, and may break in the future.
Setting up the DNS
First off, you need your "domain". This "domain" isn't actually a domain, but a local DNS record. A domain is just a string of text that gets converted to an IP by a DNS provider, but this one only works if you're using pihole as your DNS. There's probably a way to set this up with an IP as well, but since the HTTPS cert is used for the dashboard, it shouldn't break much. If you can connect to the dashboard, you can probably connect through SSH or connect the DNS.
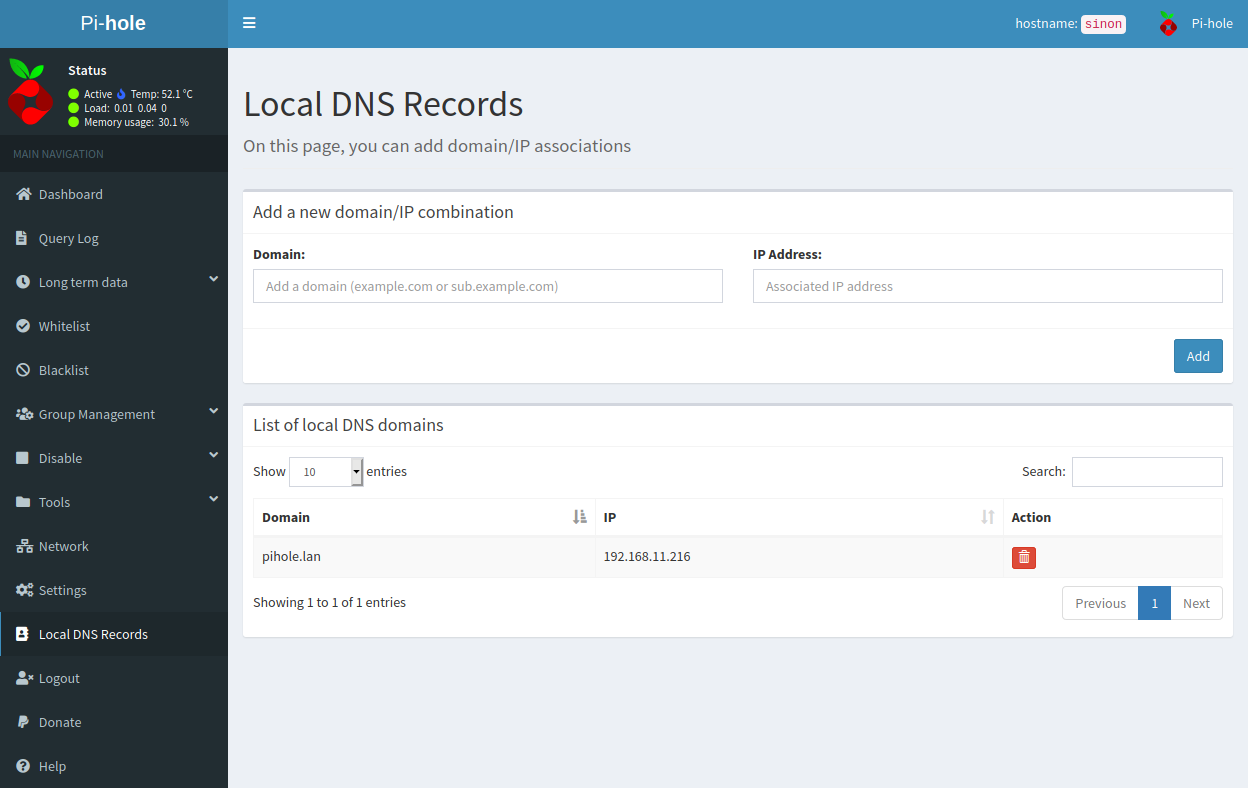
To set this up, you need to open the pihole dashboard, and log in. There's probably a way to do this from the command line, but I personally wanted a simple solution. Go to the "Local DNS settings" option in the left navbar. This lets you add custom DNS lookup rules. Fill in the domain field with whatever domain you want to use, and the IP with the IP of the pihole device. In my case, I used pihole.lan, and with my Raspberry Pi hosted on 192.168.11.216. This is an internal IPv4 address; if you're running pihole on a VPS, you use the IP of your VPS.
Now, verify that it works. Type the address into a browser on a unit connected to pihole. If you connect, you're good. Otherwise, there's most likely a configuration error somewhere. Note that if the latter happens, it could be because of the TLD. Picking .local does not work on Linux-based computers. It's a pain, and while there are ways to fix it, it's a lot easier just using a different TLD. Strictly speaking, you don't need a TLD, but this is something you can play around with on your own.
Whatever you end up with, make sure you stay with it, because you'll need it.
Setting up the certificate
This is the part that took a while to figure out. The main advantage with using LetsEncrypt over self-signing is that it uses a CA that's trusted in most browsers out of the box. Self-signing requires manually adding the root CA to your browser or device for it to be supported. If you don't, your browser will warn you that the certificate couldn't be verified - all the usual boring stuff. These can be ignored, but if you're like me and prefer not having warnings, I'll be getting back to that soon.
To make a long story short, here's a shell (.sh) script for generating the certs:
# Meta: certificate locations
# The certificate for the site
cert=crt.pem
# The private key for the site
certPk=pk.pem
# The Certificate Authority (CA) certificate
ca=ca.crt.pem
# The CA private key
caPk=ca.pk.pem

# Replace the host with whatever URL you chose.
# If you're using pihole.lan too, this line doesn't need to be changed.
host=pihole.lan

# This defines how long the cert is valid.
# This can be redefined, but I personally keep it at 365 days.
# Since this requires renewing, and not regenerating, this script
# is only useful for the initial generation, or re-creating the
# entire thing, if you feel like it.
certValidityDays=365

# Create a CA
openssl req -newkey rsa:4096 -keyout "${caPk}" -x509 -new -nodes -out "${ca}" \
  -subj "/OU=Unknown/O=Unknown/L=Unknown/ST=unknown/C=AU" -days "${certValidityDays}"

# Create a Cert Signing Request
openssl req -new -newkey rsa:4096 -nodes -keyout "${certPk}" -out csr.pem \
       -subj "/CN=${host}/OU=Unknown/O=Unknown/L=Unknown/ST=unknown/C=AU"

# Sign the certificate
openssl x509 -req -in csr.pem -CA "${ca}" -CAkey "${caPk}" -CAcreateserial -out "${cert}" \
       -days "${certValidityDays}"

# See the official post; it requires the private and public key merged into a combined file
cat "${certPk}" "${cert}" | tee ./combined.pem
Personally, I chucked this script, along with the certificates, into /etc/sslcerts (mkdir it if it doesn't exist). If OpenSSL fails to read/write, you'll need to chown the folder, or just call the script with sudo.
When it's done, you'll be left with a folder containing various keys. The only ones you need to notice are ca.crt.pem and combined.pem. These are important for the next step; linking it to lighttpd.
Setting up lighttpd
Packages
Due to changes to lighttpd, the SSL module has (stupidly, in my opinion) been completely separated from the lighttpd core. You'll therefore have to install the module separately:
sudo apt install lighttpd-mod-openssl
Linking the certs
Now that you have your certs, you'll need to link it to lighttpd. Note that syntax errors in the /etc/lighttpd/external.conf file will prevent lighttpd from starting, and it doesn't have sensible error messages in its output. (Tested when I accidentally misplaced a single quote where there shouldn't have been a single quote)
Anyway, this code is heavily based on the code in the official forum, but a few differences. sudo nano /etc/lighttpd/external.conf lets you edit it. Feel free to replace nano with your favorite editor - it really doesn't matter.
NOTE: go to the forum and grab the code before continuing. It's kept consistently up-to-date by the author, and applies here as well. If your HTTPS config breaks, go back to the forum and check if there have been changes since you last edited the config.
At the time of writing, you only need to change ssl.pemfile to point to the generated combined file:
ssl.pemfile = "/etc/sslcerts/combined.pem"
... assuming that's the path you've stored it at.
Now, when you've gotten external.conf set up, all you need to do is restart lighttpd.
sudo systemctl restart lighttpd.service
Assuming it successfully restarts, you can connect to your dashboard's HTTPS enabled URL, and you should connect over HTTPS. If your browser complains that the connection isn't secure because of an invalid issuer, that's fine. It's an artifact of self-signing a certificate that can't be bypassed in any other way than trusting the CA.
Fixing 403: unauthorised from navigating straight to your-fqdn.example.com/
I'm not entirely clear on why this appears, much less when this happens, but if you're getting a 403 out of your FQDN's root domain, a trivial fix is to simply redirect to the dashboard.
Back in etc/lighttpd/external.conf, add:
url.redirect = (
    "^/?$" => "/admin/"
)
And restart lighttpd again for the changes to take effect.
Renewing the CA and certificate
This is more of an appendix than a requirement. Depending on how long you set the certificate to be valid for, you might have to renew it at some point. Since the CA itself has a validity period as well, you can't use the same script you used to generate the keys in the first place. Doing this will completely change the root CA, so if you have a browser that explicitly trusts the CA, it will break the site.
As far as I know, you'll need to trust the new CA when you regenerate it. As long as the old CA is valid, it won't cause problems, but if it's after, it might break stuff. I'm not sure about this, however, and I have no good way to test it, so take this part with a grain of salt. This is based on this ServerFault post by Shane Madden, and the general idea is to renew the CA certificate, and not regenerate it. Of course, regenerating the entire thing is an option.
# Same as in the last script
cert=crt.pem
certPk=pk.pem
ca=ca.crt.pem
caPk=ca.pk.pem

# Also the same as in the last script
host=pihole.lan
certValidityDays=365

# Regenerate CA
# Note that this reuses the old ca.pk.pem, which is the CA private key
openssl req -new -key "${caPk}" -out csr.pem \
  -subj "/OU=Unknown/O=Unknown/L=Unknown/ST=Unknown/C=AU"
openssl x509 -req -days "${certValidityDays}" -in csr.pem -signkey "${caPk}" -out "${ca}"

# Create Cert Signing Request
openssl req -new -newkey rsa:4096 -nodes -keyout "${certPk}" -out csr.pem \
       -subj "/CN=${host}/OU=Unknown/O=Unknown/L=Unknown/ST=unknown/C=AU"

# Sign the certificate
openssl x509 -req -in csr.pem -CA "${ca}" -CAkey "${caPk}" -CAcreateserial -out "${cert}" \
       -days "${certValidityDays}"

cat "${certPk}" "${cert}" | tee ./combined.pem

Comments
Note that all comments are required to follow the code of conduct